- Knowledge Base
- Learn
- User Interface
-
Getting Help
-
Installation
-
Learn
- Business Activities
- Business Activity Manager
- Business Alerts
- Configuration
- Customer
- Database
- EDI
- General
- Inventory
- Manager Windows
- Mobile
- Picklists (Advanced Picking)
- Product
- Purchasing
- Purchase Order Manager
- QuickBooks & Acctivate Basics
- QuickBooks Desktop Sync
- QuickBooks Online Sync
- Reporting
- Sales
- Sales Order Manager
- Sales Tax
- Server
- Shipping
- Startup
- User Interface
- Webstore
-
Troubleshoot
-
Specs
-
How do I?
Customizing the Acctivate Icon bar.
This article explains how to customize the Icon Bar in Acctivate.
Acctivate includes a customizable Icon Bar. The Icon Bar can be personalized by each user to suit their specific preferences, such as displaying only necessary buttons based on frequent tasks, moving or hiding the entire toolbar and changing the icon size. Feel free to also check out our Icon Bar video for visual instructions.
Adding/Removing Icon's from the bar:
- Click the drop down arrow on the right.
- Move your mouse pointer to the 'Add or Remove Buttons' menu.
- Hover over the 'Icon Bar' to open a list of button that can be added to or removed from the Icon Bar.
- Check or uncheck the buttons that you would like to add or remove. Icons will be placed in segments separated by lines on the Icon Bar. They are arranged according to the order they appear on the Menu Bar.
Hide/Show the Icon Bar:
- Choose 'Customize...' from the 'Add or Remove Buttons' menu.
- Uncheck/check the "Icon Bar" box.
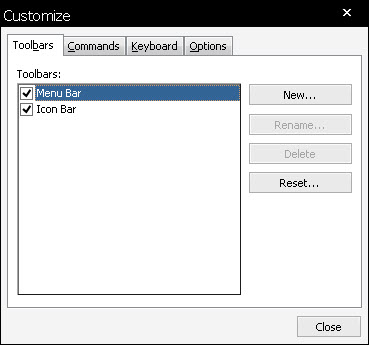 .
.
- Click Close.
Change Icon bar Icons to be small or large:
- Choose 'Customize...' from the 'Add or Remove Buttons' menu.
- Click the 'Options' tab.
- Check or uncheck the "Large icons" option as desired. (Checked for large, unchecked for small.)
- Click Close.