- Knowledge Base
- Learn
- QuickBooks Desktop Sync
-
Getting Help
-
Installation
-
Learn
- Business Activities
- Business Activity Manager
- Business Alerts
- Configuration
- Customer
- Database
- EDI
- General
- Inventory
- Manager Windows
- Mobile
- Picklists (Advanced Picking)
- Product
- Purchasing
- Purchase Order Manager
- QuickBooks & Acctivate Basics
- QuickBooks Desktop Sync
- QuickBooks Online Sync
- Reporting
- Sales
- Sales Order Manager
- Sales Tax
- Server
- Shipping
- Startup
- User Interface
- Webstore
-
Troubleshoot
-
Specs
-
How do I?
How do I set up sync permissions per user in QuickBooks Desktop?
This article explains how to set up sync permissions for QuickBooks Desktop users.
Sync permissions in Acctivate are managed on the QuickBooks. Example if you want certain users to sync Sales Invoices instead of Purchase Order bills, then you can setup the permissions in QuickBooks to do so. We recommend that you sync with an Admin account but if you want to setup restrictions, you can do so.
First Log into QuickBooks and go to Company > Users > select "Setup Users and Roles".
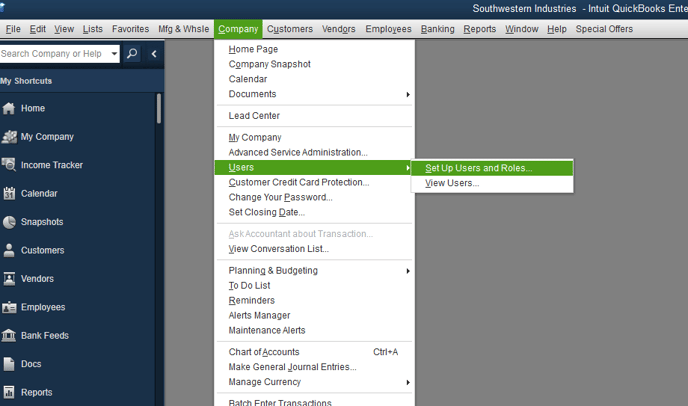
In the "Users and Roles" window, you can setup a "New" user or "Edit" an existing user. Assuming you have the users already setup in QuickBooks, you can modify their sync permissions by modifying or changing their roles. The sync between Acctivate and QuickBooks is tied to the user and what their role allows them to do. To change the permissions per role, click on the "Role List" tab.
User sync permissions that link with the Acctivate sync are "Accounting", "Customers & Receivables", "Customer & Vendor Profile Lists, "Lists", "Vendors & Payables". Each one affects the sync differently described below.
Accounting - Manages Journal entries and closing date information
Customers & Receivables - Sales invoices, Credits, payments
Customer & Vendor Profile Lists - Manage Terms List
Lists - Acctivate checks Item list for product class changes, Chart of Accounts, sales tax
Vendors & Payables - mantaining PO bills
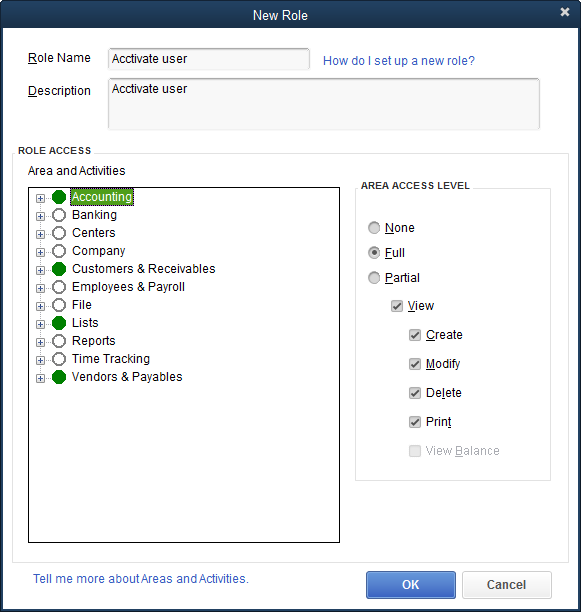
Under the "New Role", We've created an example role called "Acctivate user" and allowed full access to the 4 tables described above since those are the main Areas Acctivate syncs with. You can expand each one and setup "Area Access Level" permission as well per Area.