- Knowledge Base
- Learn
- Sales
-
Getting Help
-
Installation
-
Learn
- Business Activities
- Business Activity Manager
- Business Alerts
- Configuration
- Customer
- Database
- EDI
- General
- Inventory
- Manager Windows
- Mobile
- Picklists (Advanced Picking)
- Product
- Purchasing
- Purchase Order Manager
- QuickBooks & Acctivate Basics
- QuickBooks Desktop Sync
- QuickBooks Online Sync
- Reporting
- Sales
- Sales Order Manager
- Sales Tax
- Server
- Shipping
- Startup
- User Interface
- Webstore
-
Troubleshoot
-
Specs
-
How do I?
Setting up and Defining a Special Order Warehouse
When utilizing the Special Order module with Acctivate, you have the option of creating a separate warehouse for these orders. Special orders can be shipped to a designated warehouse and received into that warehouse, in order to isolate these items from other inventory. To do this an additional warehouse must be defined in the system and assigned to the products. The system administrator can also set this as a default Warehouse for special orders related to a Branch.
Creating Special Order Warehouse- Select File > Configuration Management
- Navigate to Inventory > Warehouse to open the Warehouse Information configuration section.
- Click the New button to create a new warehouse.
- Enter all the necessary information into the provided fields on the right side. This includes an ID, Description, Name, Address, and Inventoried GL Accounts. Feel free to create and use separate GL Accounts for these records.
- Check the Active box in order to use this warehouse.
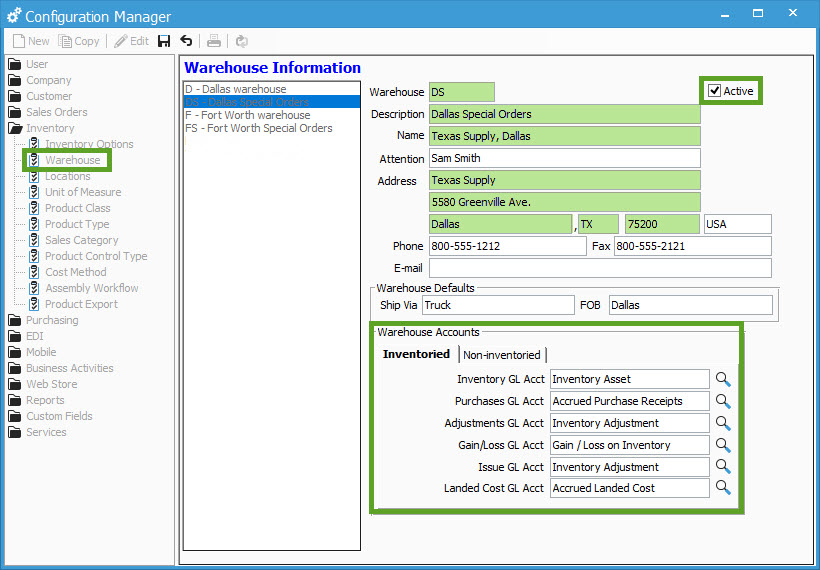
- Click Save. The new warehouse should now appear in the Warehouse selection box, near the left among your other warehouses.
In order to have the appropriate warehouse selected throughout the special order purchasing process, the new warehouse can be set as a default when designating special order items specific to each Branch.
- Still in Configuration Management, navigate to Customer > Branch
- Select the appropriate branch from the Branch selection box (the list of branches on the left).
- Click Edit
- Choose the newly created Special Order Warehouse in the Default Warehouse for Special Orders drop-down menu.
- Click Save
