Some information and options on how to handle samples from your vendor
Receiving samples of a product from your vendor can be handled a few different ways within Acctivate. This article will cover some of the ways that vendor samples can be handled in Acctivate.
1: Sample Warehouse
The first option for handling samples from your vendor is to use a virtual ‘Samples’ warehouse. This will allow you to use the same products which already exist in Acctivate, without affecting the cost of those products in your normal warehouse(s). Since the goods will be received at $0.00 cost from your Vendor, receiving these goods into a normal warehouse would affect the cost of the product in that warehouse.
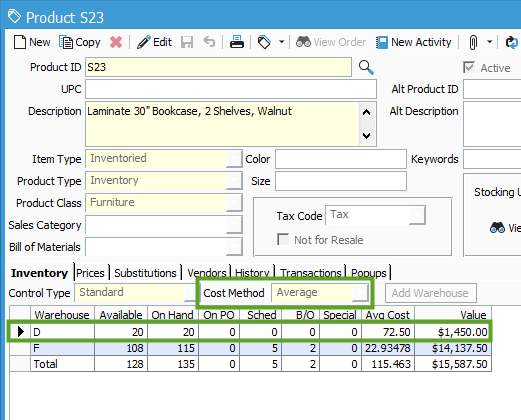
We are able to see Product S23 in the screenshot below. S23 uses Average Cost, it shows 20 OnHand in the D warehouse with an Average Cost of $72.50. If a Receipt is posted to bring in another 20 from your vendor for samples at $0.00 cost, then the OnHand would be changed to 40 while the Value would still show $1450.00, causing the Average Cost to be reduced to $36.25, which you may not wish to do.
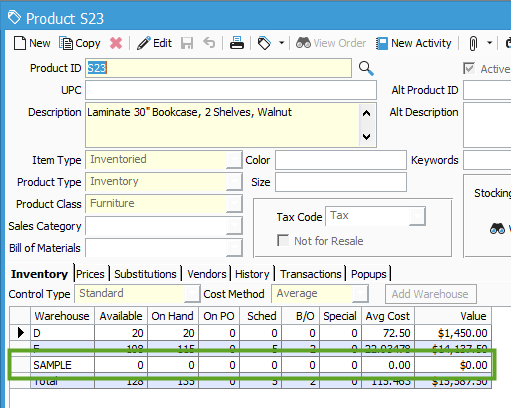
Following the steps in our Creating a New Warehouse article, you can create a new Warehouse specifically to handle Samples. In the example below, the new warehouse was called SAMPLE which was related to the S23 product. As you can see, the SAMPLE Warehouse shows 0 in inventory, but if I post that Receipt to bring in 20 at $0.00 cost, it will not affect the Average Cost in my D warehouse. When the samples of S23 are sold, simply select to use the SAMPLE warehouse.
2: Non-Inventoried Product
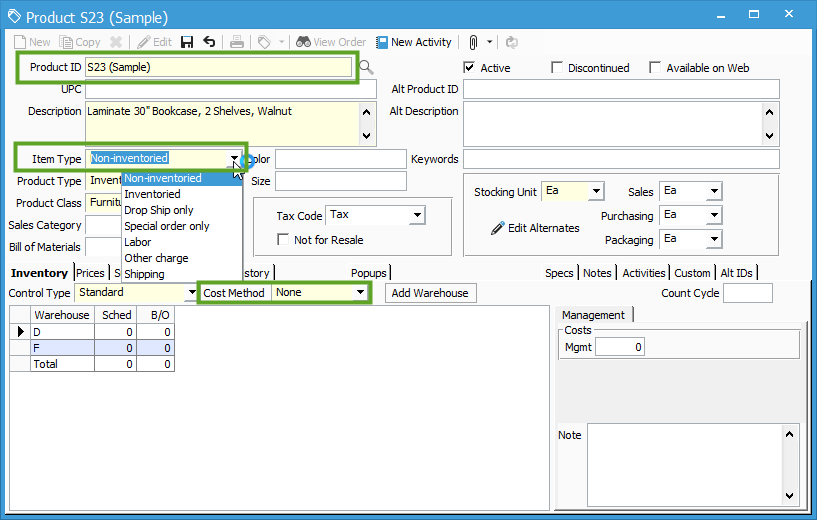
Another way to manage vendor samples would be to create a new, non-inventoried product to represent the samples. Since this is a non-inventoried product (and the Cost Method isn’t set to Standard), no cost will be related to this product. This means that you will not have to create a new Warehouse to track these goods, but it also means that the product will not have a related Quantity on Hand. Further, this will require that you create a new product, which will be tracked separately from the regular, inventoried product.
The easiest way to do this is to Copy the existing product, set a unique Product ID, then set the Item Type to be Non-inventoried and the Cost Method to be None.
Once the Non-inventoried product exists in the system, you should be able to add it to POs with a $0.00 price. Because they are not Inventoried products, they will not show on the Receipt which is created from the PO.
3: Non-standard Lines
Similar to Non-inventoried products, you could use Non-standard lines on the Purchase Orders and Sales Orders where you are using these sample products. Non-standard lines are not actually products which exist in Acctivate. For more information on the differences between Non-standard and Non-inventoried products, check out this help article.
4: Vendor Discounts
Another option would be to add a discount to the PO Invoice which brings the sample products into inventory. You could post the Receipt with normal cost, so that your regular inventory is not effected, then simply apply a discount to the PO Invoice. This can be done a few different ways. The first option is to add an Other Amount to the PO Invoice which offsets the Total Amount of what was received for your sample products. This option is discussed in more detail in this help article. The second option would be to set a Terms Code which includes a 100% discount which will be applied to the Vendor Bill once it’s synced into QuickBooks. This option is discussed in more detail in this help article.
If you get stuck and need help, you can contact Support here.