Check out this article for a link to our training guide about entering payments for sales orders.
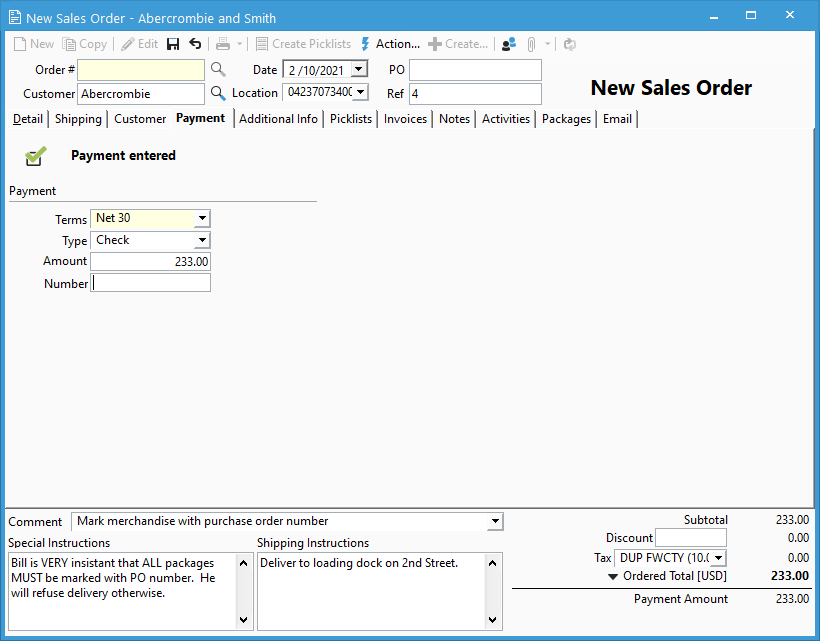
If a customer gives you payment when creating an order, you can enter the payment information at the bottom of the Sales Order window. Entering the payment here will not synchronize over to QuickBooks since this requires an invoice. It will be to simply track the payment received until you release the order for invoicing. If you wish to send this payment to QuickBooks immediately, check out our Customer Deposit article or Customer Payment webinar for details.
When the Sales Order is released for invoicing, the payment information will copy over into the Release window and synchronize to QuickBooks. If the customer gave you a partial payment, the remaining payments will need to be entered directly into QuickBooks and applied to the invoice. This is due to not having the ability to edit a completed order.
You can also enter pre-payments for sales orders using the Customer Payment window. Please see our training guide for more information.
Here's how to enter a payment on a sales order:
- Navigate to Sales > Sales Order or click the Sales Order icon to open the Sales Order window.
- Open the existing sales order you want to receive payment for by either manually typing the order number and pressing the tab key or clicking the magnifying glass to look up a specific sales order.
- Click the Edit button.
- Go to the Payment tab
- From the Type drop-down list select the type of payment that was received (i.e. cash, check, credit card).
- When Type is selected the total amount of the sales order will automatically appear in the Payment Amount field and next to that field it will display Payment Amount. If this is a partial payment, enter that amount into the Payment Amount field which will update the balance due.
- If necessary based on the Type selected, enter the check or credit card number into the Number field and if Type is credit card enter its expiration date into the Expires field. If you have a Type that requires this information, a prompt will appear for this information to be entered and will not allow you to continue until this information has been entered (so you won’t be able to change the amount in the Payment Amount field until you obey the prompt).
- When finished, click Save
- The invoice is now complete, so when synchronization is performed, the payment will move to QuickBooks. The payment will debit Accounts Receivable with the payment amount applied to it. The payment will debit to the default bank account in QuickBooks, but if the option to Use Undeposited Funds as default to account is enabled in QuickBooks, then it will go to the Undeposited Funds account. The Accounts Receivable will credit the payment. Review our docs page for more on the payment journal.
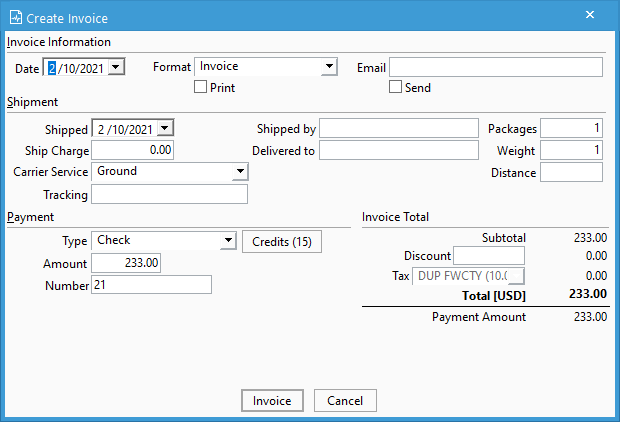
Here's how to Invoice once a payment has been entered:
- After you have entered all necessary information into the Payment section and have received the full payment, you can release the order for invoicing by clicking Create Invoice. This will complete the order if all lines are Scheduled. If there are more payments to be received, those will need to be entered directly into QuickBooks.
- The Invoice Order window will open with the payment information copied into the proper fields. Enter any other necessary information into the provided fields and check the desired checkboxes (Print Invoice Now, Preview, Email Invoice Now).
- Click the Invoice button.
- The invoice is now complete, so when synchronization is performed, the invoice and the payment will move to QuickBooks. The invoice will go to Accounts Receivable with the payment amount applied to it. The payment will be posted to the default bank account in QuickBooks, but if the option to Use Undeposited Funds as default to account is enabled in QuickBooks, then it will go to the Undeposited Funds account for the user to decide which deposit to match it to. Review our docs page for more on the invoice journal.
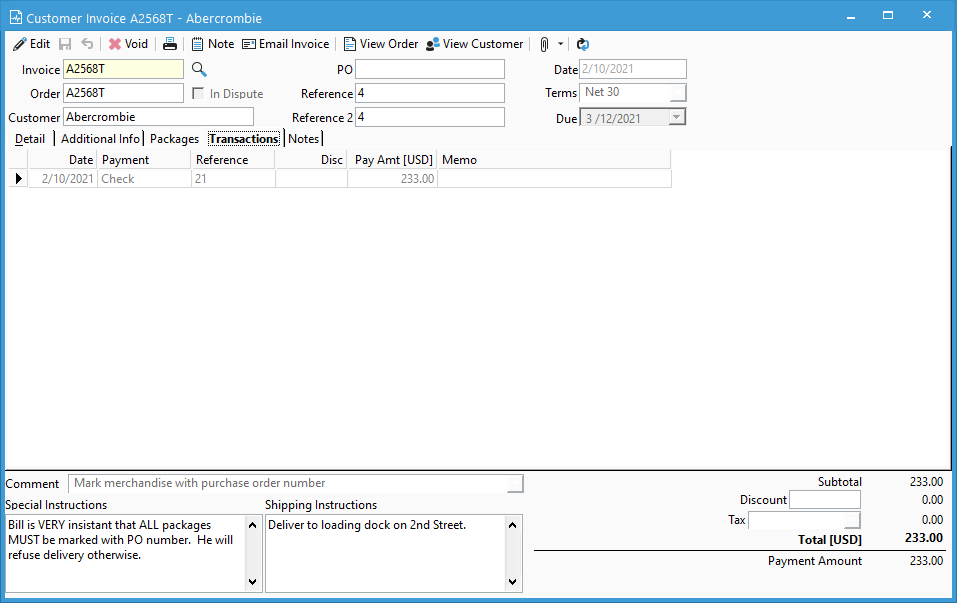
Viewing Payments Applied to Invoice
- Open the Customer Invoice window by selecting Customer > Invoice / Credit Memo.
- To open a specific invoice enter the invoice number manually into the Invoice field or use the Lookup button to the right of the Invoice field to find an invoice by a specific criterion (i.e. order number).
- Click on the Transactions tab of the Invoice to see all applied payments
For more information about payments, check out our training guide.