This articles goes step by step on how to move Acctivate and its data to a new server.
Acctivate can be moved to a new server computer at any time. Please read through all of the instructions before you begin. The following article applies to companies that are running a local, on-premises copy of Acctivate.
NOTE: If you are using a different version of SQL Server other than the default Express 2019 version that Acctivate creates, please review the SQL Server setup for Acctivate article linked below first before continuing here.
This article assumes that you will be using the SQL Server Express 2022 instance that Acctivate installs by default. If this isn't the case, then for steps on setting up SQL Server properly for Acctivate to connect with it, start with the SQL Server for Acctivate article. That guide outlines the various settings that Acctivate normally does on its own during the default Express 2019 install and will be needed in any custom install.
- A. Install Acctivate on NEW server
- B. Copy Custom Crystal Reports to NEW Server
- Skip this step if you're on Acctivate version 12.1 or higher as reports are now stored in the database.
- C. Synchronize Acctivate and QuickBooks
- D. Backup the Acctivate Database(s) on OLD Server
- E. Copy QuickBooks Company File(s) to NEW Server
- F. Set up the Acctivate Company List on NEW Server
- G. Restore Acctivate Database(s) on NEW Server
- H. Log In and Verify Each Restored Company on NEW Server
- I. Update Acctivate Workstations
- J. Remove Acctivate from the Old Server
A. Install Acctivate on NEW Server
- Please refer to our Server Install guide for step-by-step instructions.
- For SQL compatibility purposes we recommend using the Acctivate Full Install from the Acctivate Downloads site.
- Do not proceed until Acctivate is running and registered on the new server.
- The Acctivate license will be automatically transferred to the new server. A 10 day grace period is included in the license transfer to allow you to continue running Acctivate on your current server, while you set up the new server.
B. Copy Custom Crystal Reports to NEW Server
Please Note: As of 12.1, reports are now stored in the Acctivate database. If you're on version 12.1 or higher, you can skip this step.
- Launch Windows Explorer and navigate to the Custom Reports folder on the old server located at C:\ProgramData\Alterity\ACCTivate\CustomReports. Alternatively, this should also be a shared folder with the path \\YourServerName\AcctivateData\CustomReports where "YourServerName" is the computer name of your server.
- Please Note: The "ProgramData" folder may be hidden by default within windows. You can enable view "Hidden Items" in the "View" tab of File Explorer, or you can copy and paste the path to be taken to the folder.
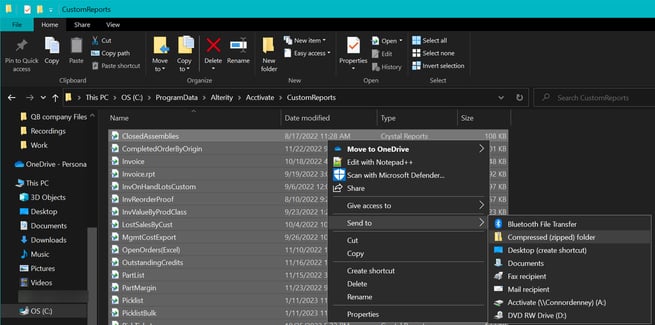
- Select all files in that folder (Ctrl+A)
- Right click on any file and select Send to > Compressed (zipped) folder.
- Adjust the file name of the Compressed (zipped) folder to AcctivateCustomReports_20230113 (replacing with today’s date).
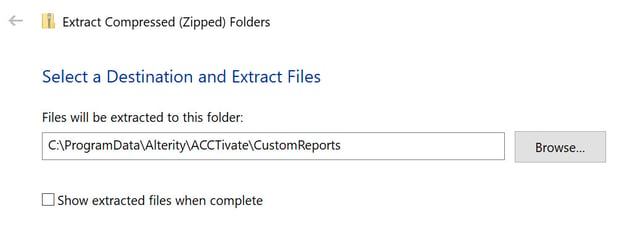
- Copy this file to any location on the new server. Right-click the zip file and choose Extract All.
- Adjust the Destination Folder to the Custom Reports folder on the new server (e.g., C:\ProgramData\Alterity\ACCTivate\CustomReports)
C. Synchronize Acctivate and QuickBooks on OLD server.
- Log into Acctivate on a machine with QuickBooks installed.
- Run a synchronization between Acctivate and QuickBooks
- Resolve any sync errors received.
- Repeat step 2 after resolving any errors.
- Exit Acctivate before moving to next step.
D. Backup the Acctivate Database(s) on OLD server
- Launch Acctivate Database Maintenance from the Windows Start menu (Acctivate folder) on the OLD computer.
- Select Backup / Restore from the Database menu.
- Select the Company from the drop-down
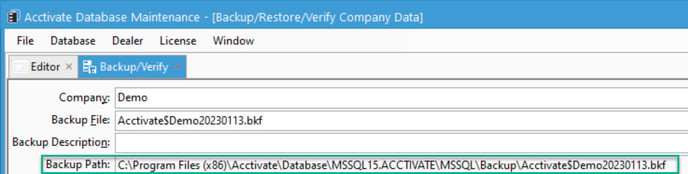
- Adjust the "Backup File" to be a unique new, file. You can add today’s date to the file name. For example, Acctivate$Demo20230113.bkf for January 1st, 2023.
- Click Start Backup and click Yes to proceed.
- We highly recommend checking the "Overwrite Existing Sets" box here so that all of your backups are overwritten with the most recent so that the file will be smaller and easier to transfer.
- Repeat the above backup procedure for each company.
- Launch Windows Explorer and locate the folder using the "Backup Path" value in the Backup/Restore window.
- Create a ZIP file containing all of the BKF files that you just created (similar to above Custom Reports process)
- Rename the ZIP file to ACCTivateDatabasesyyyymmdd.zip, replacing yyyymmdd with today’s date.
- Copy the ZIP file over the network (or with a flash USB drive) to the Desktop or Documents folder on the new server computer.
E. Copy QuickBooks Company File(s) to NEW Server
- We recommend that you create a QuickBooks Backup (QBB) on the OLD server computer, then restore it on the NEW computer.
- Further details on moving QuickBooks to a new server are not covered in this article. Please contact QuickBooks support or your certified QuickBooks ProAdvisor for assistance with QuickBooks migrations. The Acctivate support team is unable to assist with any migration for QuickBooks.
F. Set up the Acctivate Company List on NEW Server
- Launch Acctivate Database Maintenance from the Windows Start menu (Acctivate folder) on the NEW server.
- Choose Database Info from the Database menu.
- Click New Company on the toolbar.
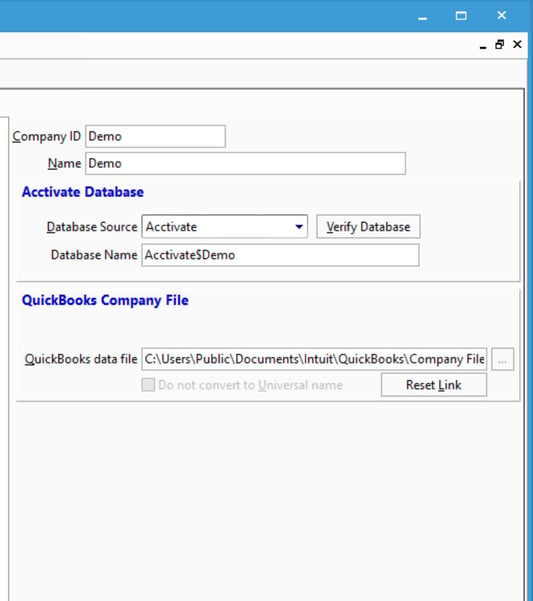
- Company ID: Short ID, no spaces or punctuation. This will form the database name (e.g., Database for “YourCompanyID” would be ACCTivate$YourCompanyID)
- Name: Full Company Name; displayed in Acctivate Window Title Bar and Company drop-down on Login window
- Database Source: This setting corresponds to the available Microsoft SQL Servers provisioned for this server. Acctivate points to the default YourServerName\ACCTIVATE instance.
- QuickBooks data file: Use the Browse (…) button to select the location of your QuickBooks file (QBW) on the NEW server computer.
- The Do not convert to Universal name option should typically be left as-is (unchecked). The QuickBooks company file is typically in a shared, network folder available for users.Fill in the Company Fields, then click Save on toolbar
- 10. Repeat steps 3-4 for each company that you are copying to the new server computer.
G. Restore Acctivate Database(s) on NEW server.
- Extract the backup files from the ZIP file to the backup folder on the new server. This directory can be found by going to C:\Program Files (x86)\Acctivate\Database. From here, drill down into the MSSQL##.ACCTIVATE version -> MSSQL -> Backup. Extract the files here.
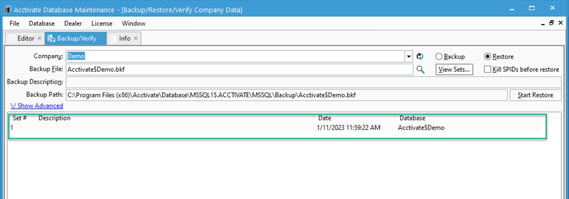
- Select Backup / Restore from the Database menu in Acctivate Database Maintenance on the NEW server.
- Select the Restore option and choose the Company from the drop-down to be restored.
- Click the Magnifying glass to open the Backup Directory and select the backup file corresponding to the company you're restoring.
- Click View Sets... to load the database backup file. Restore the latest set if there are multiple sets.
- Select the Backup Set in the list and click Start Restore.
- You will get a prompt confirming the name of the database and the company file you're restoring too. Ensure you're restoring the right database to the right company file.
- Wait for the progress bar to fill up and the restore will be complete.
H. Log in and Verify Each Restored Company on NEW Server
- Launch Acctivate on the NEW server.
- NOTE: Acctivate should be registered on the new server at this point. If not, you will NOT see your newly restored companies in the list.
- Choose the restored company from the Company drop-down and provide your credentials.
- Click Login and follow the instructions to update the database if you’ve installed a newer version of Acctivate.
- Ensure that your recent transactions exist in the restored company before continuing.
I. Update Acctivate Workstations
Please check out our article about pointing Acctivate workstations to a new server as the steps may differ between versions of Acctivate.
J. Remove Acctivate from the OLD server
Be sure that no one is still accessing Acctivate and/or QuickBooks on the old server. We recommend that you uninstall the Acctivate software and consider doing the same for Microsoft SQL Server once you have migrated to the new server. You can also just stop the SQL server service to ensure no one is connected.
You may also want to stop sharing the Acctivate folders on the old server (e.g., \\OldServer\ACCTivate, \\OldServer\ACCTivateData, etc).