An accounting period can be closed in QuickBooks in order to prevent any changes to transaction in that period. In order to close the period there are some recommended steps you should take in Acctivate as well.
Acctivate does not have a formal process to close an accounting period or year. This is a responsibility of QuickBooks. First, we recommend that you check the QuickBooks Year-End Guide:
One of the first steps in closing an accounting period (or year) is to ensure that all transactions have been posted in Acctivate and synchronized to QuickBooks. The following transactions are often overlooked during the closing process:
- Items received, but Inventory Receipts not yet entered and/or posted.
- Vendor Bills received, but Purchase Invoices not entered in Acctivate yet.
- Sales Orders have shipped but have not been invoiced yet.
- Inventory Count in progress, but not posted yet.
- Negative Inventory due to a sale ahead of the corresponding Inventory Receipt
- Verify that all transactions are posted in Acctivate.
- Review open Sales Orders, including Scheduled and Backordered. Ensure that no invoices were missed.
- Review open Purchase Orders, checking for any orders that were received and/or billed without being updated in Acctivate
- Review the Session drop-down for all Inventory Transactions windows. Delete any duplicated or mistake sessions.
- Correct any Negative Inventory (i.e., Qty on Hand below zero) mistakes.
-
- Negative inventory usually indicates that a sales invoice has been processed for an item that was not (or has not been) received into inventory.
-
After all transactions have been posted and orders invoiced, then it's time to move on to the next steps. These will vary for QuickBooks Online and QuickBooks Desktop users.
For QuickBooks Online Users:
- If your background sync has been clean, meaning no red 'X' has appeared in the bottom right of Acctivate (shown below) then you're ready to close the books in QuickBooks Online. Here's a guide from Intuit about how to do so.
- If you have errors, please resolve them and then run a manual sync after.

For QuickBooks Desktop Users:
- Synchronize with QuickBooks. Make sure to not use any of the sync options. A full sync should be run.
- Confirm there are no warnings or exceptions in the synchronization.
- Only “Green checks” should appear for each Synchronization Task
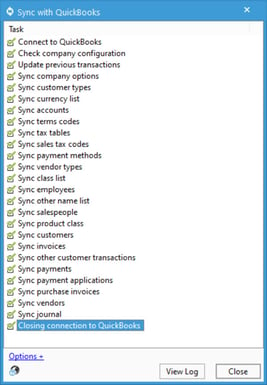
- Click View Log and confirm there are only two “Info” lines
- If you have errors, please resolve them and then run a sync after.
- Set Closing Date and Password in QuickBooks Preferences. Here's a guide from Intuit if needed.
- The Closing Date/Password blocks transactions from any third-party application, such as Acctivate.
- The Password cannot be entered during synchronization to override individual transactions.
- Synchronize with QuickBooks again
- It’s important to immediately synchronize again to update the Closing Date in Acctivate.
After closing the books:
- New Acctivate transactions prior to the closing date will be blocked.
- Transactions prior to closing date cannot be voided.
- The books will need to be re-opened to update anything prior to the closing date.